Wednesday, January 18, 2023

Create Vpc, IAM and S3 Bucket with Terraform


Understanding AWS VPCs

The AWS cloud has dozens of various services from compute, storage, networking, and more. Each of these services can communicate with each other just like an on-prem datacenter’s services. But, each of these services is independent of one another, and they are not necessarily isolated from other services. The AWS VPC changes that.


An AWS VPC is a single network that allows you to launch AWS services within a single isolated network. Technically, an AWS VPC is almost the same as owning a datacenter but with built-in additional benefits of scalability, fault-tolerance, unlimited storage, etc


Building the Terraform Configuration for an AWS VPC

Enough talk, let’s get down to building!


1. To start, create a folder to store your Terraform configuration files in. This tutorial will create a folder called terraform-vpc in your home directory.

2. Open your favorite code editor and copy/paste the following configuration already created for you saving the file as vpc.tf inside of the ~/terraform-vpc directory. Information about each resource to create is inline.

The vpc.tf file contains all the resources which are required to be provisioned.

Terraform uses several different types of configuration files. Each file is written in either plain text format or JSON format. They have a specific naming convention of either .tf or .tfjson format.

The Terraform configuration below:


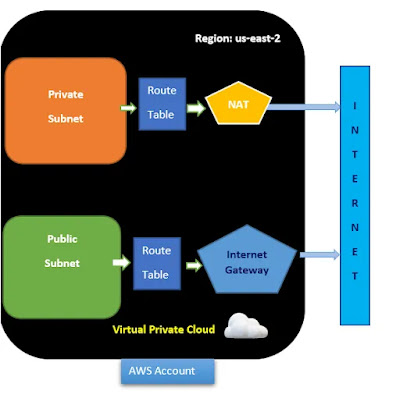
Creates a VPC

Creates an Internet Gateway and attaches it to the VPC to allow traffic within the VPC to be reachable by the outside world.

Creates a public and private subnet
Subnets are networks within networks. They are designed to help network traffic flow be more efficient and provide smaller, more manageable ‘chunks’ of IP addresses

Creates a route table for the public and private subnets and associates the table with both subnets

#Create AWS VPC
resource "aws_vpc" "YOUR_DESIRED_NAME" {
  cidr_block       = "10.0.0.0/16"
  instance_tenancy = "default"
  enable_dns_support   = "true"
  enable_dns_hostnames = "true"


  tags = {
    Name = "YOUR_DESIRED_NAME"
  }
}

# Public Subnets in Custom VPC
resource "aws_subnet" "YOUR_DESIRED_NAME-public-1" {
  vpc_id                  = aws_vpc.YOUR_DESIRED_NAME.id
  cidr_block              = "10.0.1.0/24"
  map_public_ip_on_launch = "true"
  availability_zone       = "us-east-1a"

  tags = {
    Name = "YOUR_DESIRED_NAME-public-1"
  }
}

resource "aws_subnet" "YOUR_DESIRED_NAME-public-2" {
  vpc_id                  = aws_vpc.YOUR_DESIRED_NAME.id
  cidr_block              = "10.0.2.0/24"
  map_public_ip_on_launch = "true"
  availability_zone       = "us-east-1b"

  tags = {
    Name = "YOUR_DESIRED_NAME-public-2"
  }
}

resource "aws_subnet" "YOUR_DESIRED_NAME-public-3" {
  vpc_id                  = aws_vpc.YOUR_DESIRED_NAME.id
  cidr_block              = "10.0.3.0/24"
  map_public_ip_on_launch = "true"
  availability_zone       = "us-east-1c"

  tags = {
    Name = "YOUR_DESIRED_NAME-public-3"
  }
}

# Private Subnets in Custom VPC
resource "aws_subnet" "YOUR_DESIRED_NAME-private-1" {
  vpc_id                  = aws_vpc.YOUR_DESIRED_NAME.id
  cidr_block              = "10.0.4.0/24"
  map_public_ip_on_launch = "false"
  availability_zone       = "us-east-1a"

  tags = {
    Name = "YOUR_DESIRED_NAME-private-1"
  }
}

resource "aws_subnet" "YOUR_DESIRED_NAME-private-2" {
  vpc_id                  = aws_vpc.YOUR_DESIRED_NAME.id
  cidr_block              = "10.0.5.0/24"
  map_public_ip_on_launch = "false"
  availability_zone       = "us-east-1b"

  tags = {
    Name = "YOUR_DESIRED_NAME-private-2"
  }
}

resource "aws_subnet" "YOUR_DESIRED_NAME-private-3" {
  vpc_id                  = aws_vpc.YOUR_DESIRED_NAME.id
  cidr_block              = "10.0.6.0/24"
  map_public_ip_on_launch = "false"
  availability_zone       = "us-east-1c"

  tags = {
    Name = "YOUR_DESIRED_NAME-private-3"
  }
}

# Custom internet Gateway
resource "aws_internet_gateway" "levelup-gw" {
  vpc_id = aws_vpc.YOUR_DESIRED_NAME.id

  tags = {
    Name = "levelup-gw"
  }
}

#Routing Table for the Custom VPC
resource "aws_route_table" "levelup-public" {
  vpc_id = aws_vpc.YOUR_DESIRED_NAME.id
  route {
    cidr_block = "0.0.0.0/0"
    gateway_id = aws_internet_gateway.levelup-gw.id
  }

  tags = {
    Name = "levelup-public-1"
  }
}

resource "aws_route_table_association" "levelup-public-1-a" {
  subnet_id      = aws_subnet.YOUR_DESIRED_NAME-public-1.id
  route_table_id = aws_route_table.levelup-public.id
}

resource "aws_route_table_association" "levelup-public-2-a" {
  subnet_id      = aws_subnet.YOUR_DESIRED_NAME-public-2.id
  route_table_id = aws_route_table.levelup-public.id
}

resource "aws_route_table_association" "levelup-public-3-a" {
  subnet_id      = aws_subnet.YOUR_DESIRED_NAME-public-3.id
  route_table_id = aws_route_table.levelup-public.id
}


3. Create one more file inside ~/terraform-vpc directory, paste in the following code, and name it as provider.tf to define the AWS provider. The tutorial will be creating resources in the us-east-2 region.


The providers file defines providers such as AWS, Oracle or Azure, etc., so that Terraform can connect with the correct cloud services. provider "aws" { region = "us-east-2" }

provider "aws" {
  region     = var.AWS_REGION
}


4. Create one more file inside ~/terraform-vpc directory, paste in the following code, and name it as nat.tf to define the AWS provider. The tutorial will be creating resources in the us-east-1 region.


#Define External IP
resource "aws_eip" "YOUR_DESIRED_NAME-nat" {
  vpc = true
}

resource "aws_nat_gateway" "YOUR_DESIRED_NAME-nat-gw" {
  allocation_id = aws_eip.YOUR_DESIRED_NAME-nat.id
  subnet_id     = aws_subnet.YOUR_DESIRED_NAME-public-1.id
  depends_on    = [aws_internet_gateway.YOUR_DESIRED_NAME-gw]

tags = {
    Name = "YOUR_DESIRED_NAME"
  }
}

resource "aws_route_table" "YOUR_DESIRED_NAME-private" {
  vpc_id = aws_vpc.YOUR_DESIRED_NAME.id
  route {
    cidr_block     = "0.0.0.0/0"
    nat_gateway_id = aws_nat_gateway.YOUR_DESIRED_NAME-nat-gw.id
  }

  tags = {
    Name = "YOUR_DESIRED_NAME-private"
  }
}

# route associations private
resource "aws_route_table_association" "level-private-1-a" {
  subnet_id      = aws_subnet.YOUR_DESIRED_NAME-private-1.id
  route_table_id = aws_route_table.YOUR_DESIRED_NAME-private.id
}

resource "aws_route_table_association" "level-private-1-b" {
  subnet_id      = aws_subnet.YOUR_DESIRED_NAME-private-2.id
  route_table_id = aws_route_table.YOUR_DESIRED_NAME-private.id
}

resource "aws_route_table_association" "level-private-1-c" {
  subnet_id      = aws_subnet.YOUR_DESIRED_NAME-private-3.id
  route_table_id = aws_route_table.YOUR_DESIRED_NAME-private.id
}

Then Create another file called Variable.tf then copy the below command inside it

variable "AWS_REGION" {
  default = "us-east-1"
}

Running Terraform to Create the AWS VPC

Now that you have the Terraform configuration file and variables files ready to go, it’s time to initiate Terraform and create the VPC! To provision, a Terraform configuration, Terraform typically uses a three-stage approach terraform init → terraform plan → terraform apply. Let’s walk through each stage now. 1. Open a terminal on your vscode.

2. Run the terraform init command in the same directory. The terraform init command initializes the plugins and providers which are required to work with resources.

terraform init If all goes well, you should see the message Terraform has been successfully initialized in the output, as shown below. Terraform initialized successfully Terraform initialized successfully

3. Now, run the terraform plan command. This is an optional, yet recommended action to ensure your configuration’s syntax is correct and gives you an overview of which resources will be provisioned in your infrastructure. terraform plan terraform plan


If successful, you should see a message like Plan: "X" to add, "Y" to change, or "Z" to destroy in the output to indicate the command was successful. You will also see every AWS resource Terraform intends to create. Plan command execution Plan command execution 4. Next, tell Terraform actually to provision the AWS VPC and resources using terraform apply. When you invoke terraform apply, Terraform will read the configuration (main.tf) and the other files to compile a configuration. It will then send that configuration up to AWS as instructions to build the VPC and other components.


terraform apply Terraform apply command execution Terraform apply command execution


Steps to create an S3 bucket using Terraform

In this section, we will first discuss the S3 bucket and then the main Terraform configuration file.
We will also cover the AWS S3 object bucket in terraform.

1. Create S3 bucket module
Create a module that will have a basic S3 file configuration. For that, create one folder named “S3,” we will have two files: bucket.tf and var.tf.

2. Define bucket
Open bucket.tf and define bucket in that.

bucket.tf

resource "aws_s3_bucket" "demos3" {
    bucket = "${var.bucket_name}" 
    acl = "${var.acl_value}"   
}

Explanation

We have a block with the key name “resource” with resource type “aws_s3_bucket”– which we want to create.
It has a fixed value, and it depends on the provider.
Here we have an AWS S3 resource where AWS is our provider and S3 is our resource.
“Demos3” is the resource name that the user provides.
Bucket and ACL are the argument types for our resource. We can have different arguments according to our needs and their corresponding values.
Either we can provide value directly or use the var.tf file to declare the value of an argument.
3. Define variables
In var.tf, we will define variables for the bucket.tf

var.tf


variable "bucket_name" {}

variable "acl_value" {
    default = "private"
}


Explanation

As mentioned above, var.tf is used to declare values of variables.
We can either provide a default value to be used when needed or ask for value during execution.


The Next Config is to Use Terraform to provision Iam USers

Use the below config

create a folder for IAM_Users

and create a file named main.tf

terraform {
  required_providers {
    aws = {
      source  = "hashicorp/aws"
      version = "3.42.0"
    }
  }
}

provider "aws" {
  region = var.region
}

resource "aws_iam_group" "developers" {
  name = "developers"
}

resource "aws_iam_user" "new_user" {
  name = "new_user"
}

resource "aws_iam_user_group_membership" "new_user" {
  user   = "${aws_iam_user.new_user.name}"
  groups = ["developers"]
}

resource "aws_iam_access_key" "my_access_key" {
  user = aws_iam_user.new_user.name
  pgp_key = var.pgp_key
}


resource "aws_iam_user_login_profile" "new_user" {
  user    = "${aws_iam_user.new_user.name}"
  pgp_key = "keybase:apprenticecto"
}

output "password" {
  value = "${aws_iam_user_login_profile.new_user.encrypted_password}"
  sensitive = false
}

output "secret" {
  value = aws_iam_access_key.my_access_key.encrypted_secret
  sensitive = true
}  
 

Create another file called variables.tf

variable "region" {
  default = "us-east-1"
}

variable "pgp_key" {
 description = "Either a base-64 encoded PGP public key, or a keybase username in the form keybase:username. Used to encrypt the password and the access key on output to the console."
 default     = ""
}


Run the necessary terraform commands which is Terraform init, Plan and Apply


No comments:

Post a Comment

Jenkins Scripted Pipeline - Create Jenkins Pipeline for Automating Builds, Code quality checks, Deployments to Tomcat - How to build, deploy WARs using Jenkins Pipeline - Build pipelines integrate with github, Sonarqube, Slack, JaCoCo, Nexus, Tomcat

  Jenkins Scripted Pipeline - Create Jenkins Pipeline for Automating Builds, Code quality checks, Deployments to Tomcat - How to build, depl...