Tuesday, October 17, 2023

Jenkins Scripted Pipeline - Create Jenkins Pipeline for Automating Builds, Code quality checks, Deployments to Tomcat - How to build, deploy WARs using Jenkins Pipeline - Build pipelines integrate with github, Sonarqube, Slack, JaCoCo, Nexus, Tomcat


Jenkins Scripted Pipeline - Create Jenkins Pipeline for Automating Builds, Code quality checks, Deployments to Tomcat - How to build, deploy WARs using Jenkins Pipeline - Build pipelines integrate with github, Sonarqube, Slack, JaCoCo, Nexus, Tomcat

What are Pipelines in Jenkins?

- Pipelines are better than freestyle jobs, you can write a lot of complex tasks using pipelines when compared to Freestyle jobs.
- You can see how long each stage takes time to execute so you have more control compared to freestyle.
- Pipeline is groovy based script that have set of plug-ins integrated for automating the builds, deployment and test execution.
- Pipeline defines your entire build process, which typically includes stages for building an application, testing it and then delivering it. 
 - You can use snippet generator to generate pipeline code for the stages you don't know how to write groovy code.
- Pipelines are two types - Scripted pipeline and Declarative pipeline. Click here to know the difference between them.

Pre-requisites:
Install plug-ins
1. Install Deploy to container, Slack, Jacoco, Nexus Artifact Uploader and SonarQube plug-ins (if already installed, you can skip it)

Steps to Create Scripted Pipeline in Jenkins

1. Login to Jenkins

2. Create a New item

3. Give name as MyfirstPipelineJob and choose pipeline

4. Click ok. Pipeline is created now

5. Under build triggers, click on poll SCM, schedule as

H/02 * * * *

6. Go to Pipeline definition section, click on Pipeline syntax link. under sample step drop down, choose checkout: Checkout from version control. enter bitbucket or GitHub Repository URL, and enter right credentials. Click here to learn to use PAT if you are using GitHub. scroll down, click on Generate Pipeline script. Copy the code.

7. Now copy the below pipeline code highlighted section into Pipeline section in the pipeline. Please copy stage by stage

8. Change Maven3, SonarQube variables and also Slack channel name as highlighted above in red as per your settings.

9. For Nexus Upload stage, You need to change the Nexus URL and credentials ID for Nexus (which you can grab from Credentials tab after login)

10. For Dev Deploy stage, you can copy credentials ID used for connecting to Tomcat.


Pipeline Code:

node {

    def mvnHome = tool 'Maven3'
    stage ("checkout")  {
       copy code here which you generated from step #6
    }

   stage ('build')  {
    sh "${mvnHome}/bin/mvn clean install -f MyWebApp/pom.xml"
    }

     stage ('Code Quality scan')  {
       withSonarQubeEnv('SonarQube') {
       sh "${mvnHome}/bin/mvn -f MyWebApp/pom.xml sonar:sonar"
        }
   }
  
   stage ('Code coverage')  {
       jacoco()
   }

   stage ('Nexus upload')  {
        nexusArtifactUploader(
        nexusVersion: 'nexus3',
        protocol: 'http',
        nexusUrl: 'nexus_url:8081',
        groupId: 'myGroupId',
        version: '1.0-SNAPSHOT',
        repository: 'maven-snapshots',
        credentialsId: '2c293828-9509-49b4-a6e7-77f3ceae7b39',
        artifacts: [
            [artifactId: 'MyWebApp',
             classifier: '',
             file: 'MyWebApp/target/MyWebApp.war',
             type: 'war']
        ]
     )
    }
   
   stage ('DEV Deploy')  {
      echo "deploying to DEV Env "
      deploy adapters: [tomcat9(credentialsId: '4c55fae1-a02d-4b82-ba34-d262176eeb46', path: '', url: 'http://your_tomcat_url:8080')], contextPath: null, war: '**/*.war'

    }

  stage ('Slack notification')  {
    slackSend(channel:'channel-name', message: "Job is successful, here is the info -  Job '${env.JOB_NAME} [${env.BUILD_NUMBER}]' (${env.BUILD_URL})")
   }

   stage ('DEV Approve')  {
            echo "Taking approval from DEV Manager for QA Deployment"     
            timeout(time: 7, unit: 'DAYS') {
            input message: 'Do you approve QA Deployment?', submitter: 'admin'
            }
     }

stage ('QA Deploy')  {
     echo "deploying into QA Env " 
deploy adapters: [tomcat9(credentialsId: '4c55fae1-a02d-4b82-ba34-d262176eeb46', path: '', url: 'http://your_tomcat_url:8080')], contextPath: null, war: '**/*.war'

}

  stage ('QA notify')  {
    slackSend(channel:'channel-name', message: "QA Deployment was successful, here is the info -  Job '${env.JOB_NAME} [${env.BUILD_NUMBER}]' (${env.BUILD_URL})")
   }

stage ('QA Approve')  {
    echo "Taking approval from QA manager"
    timeout(time: 7, unit: 'DAYS') {
        input message: 'Do you want to proceed to PROD Deploy?', submitter: 'admin,manager_userid'
  }
}

stage ('PROD Deploy')  {
     echo "deploying into PROD Env " 
deploy adapters: [tomcat9(credentialsId: '4c55fae1-a02d-4b82-ba34-d262176eeb46', path: '', url: 'http://your_tomcat_url:8080')], contextPath: null, war: '**/*.war'

}
}

11. Click Apply, Save
12. Now click on Build. It should execute all the stages and show pipeline view like this.


Jenkins Nexus Integration - How to integrate Nexus with Jenkins


Jenkins Nexus Integration - How to integrate Nexus with Jenkins


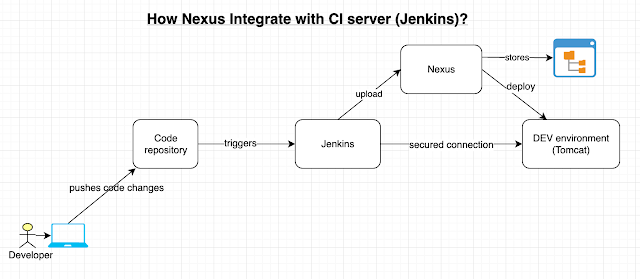
You need to install Nexus Artifact Uploader plug-in to integrate Nexus with Jenkins. Let us see how to integrate Jenkins with Nexus and able to upload War/Ear/Jar/Exe/DLLs.


Pre-requistes:

Install Nexus Artifact Uploader plugin in Jenkins.


Steps:

1. Once you installed the above plug-ins, click existing FreeStyle job configuration or create a new job.

2. Under source code management. enter bitbucket repo url and git credentials.

3. Go to build section, add Maven targets. with goals clean install. Also click advance, give path of POM.xml


4. click on Add build step, choose Nexus artifact uploader.


6. Click on Apply, Save.


7. Now login to Nexus repo, Click on Components, Click on maven-snapshots


8. you shall see the WAR being uploaded here.

How to Install Nexus on RedHat Linux


How to Install Nexus on RedHat Linux

Nexus is binary repository manager, used for storing build artifacts. We will eventually integrate Nexus with Jenkins for uploading WAR/EAR/JAR files there.

Here are the steps for installing Sonatype Nexus 3 in RHEL in EC2 on AWS. Please create a new Redhat EC2 instance with small type. Choose Redhat Enterprise 8.


Pre-requisites:
Make sure you open port 8081 in AWS security group

Installation Steps:

sudo yum install wget -y


Download Open JDK

sudo yum install java-1.8.0-openjdk.x86_64 -y

Execute the below command to navigate to /opt directory by changing directory:
cd /opt

Download Nexus
sudo wget http://download.sonatype.com/nexus/3/nexus-3.23.0-03-unix.tar.gz

Extract Nexus
sudo tar -xvf nexus-3.23.0-03-unix.tar.gz
sudo mv nexus-3.23.0-03 nexus

Create a user called Nexus
sudo adduser nexus

Change the ownership of nexus files and nexus data directory to nexus user.
sudo chown -R nexus:nexus /opt/nexus

sudo chown -R nexus:nexus /opt/sonatype-work

Configure to run as Nexus user
change as below screenshot by removing # and adding nexus
 sudo vi /opt/nexus/bin/nexus.rc


Modify memory settings in Nexus configuration file
sudo vi /opt/nexus/bin/nexus.vmoptions

Modify the above file as shown in red highlighted section:


-Xms512m
-Xmx512m
-XX:MaxDirectMemorySize=512m

after making changes, press wq! to come out of the file.

Configure Nexus to run as a service

sudo vi /etc/systemd/system/nexus.service
Copy the below content highlighted in green color.

[Unit]
Description=nexus service
After=network.target
[Service]
Type=forking
LimitNOFILE=65536
User=nexus
Group=nexus
ExecStart=/opt/nexus/bin/nexus start
ExecStop=/opt/nexus/bin/nexus stop
User=nexus
Restart=on-abort
[Install]
WantedBy=multi-user.target

Create a link to Nexus
sudo ln -s /opt/nexus/bin/nexus /etc/init.d/nexus

Execute the following command to add nexus service to boot.

sudo chkconfig --add nexus
sudo chkconfig --levels 345 nexus on


Start Nexus
sudo service nexus start


Check whether Nexus service is running
sudo service nexus status

Check the logs to see if Nexus is running
tail -f /opt/sonatype-work/nexus3/log/nexus.log

You will see Nexus started..
If you Nexus stopped, review the steps above.

Now press Ctrl C to come out of this windows.

Once Nexus is successfully installed, you can access it in the browser by URL - http://public_dns_name:8081

Click on Sign in link
user name is admin and password can be found by executing below command:

sudo cat /opt/sonatype-work/nexus3/admin.password


Copy the password and click sign in.
Now setup admin password as admin123

you should see the home page of Nexus:


Monday, April 17, 2023

Project Batch 3

   MULTISHOP        is a big conglomerate and has various locations in both warehouses and stores world wide. They currently have a legacy web Application written in Java and hosted by their private server.

It usually takes 5hrs to update their application and updates are manual, which incurs a lot of downtime and is affecting their business because clients get locked out which gives their competitors upper hand.


Your Task is to migrate this Application into the cloud and implement Devops Practices to their entire Software Development Life Cycle


You should show concepts that implement Plan --Code--Build--Test--Deploy--Monitor


TASK A: Version Control The MultiShop Project

Plan & Code

 Your Project Supervisor will provide you the link to access the private repository where the code currently lives. and You can clone this repo and make it yours with the same repository name.


(You can only use GitHub)- 

1) Set up 2 repos, a Build Repo to store all the code base and a Deployment Repo to store all your deployment scripts and name them accordingly as you see below(in green): 

  • Build repo : MultiShop_Build  
  • Deployment repo: MultiShop_Deploy  

2)Git branching Strategy for MultiShop_Build

  • main
  • release: eg    release/release-v1
  • feature:   eg  feature/feature-v1
  • develop

3)Git branching Strategy for MultiShop_Deploy
  • master
  • feature eg feature/feature-v1
  • develop

TASK B Acceptance Criteria: 

You need to host the code on a static website (s3 bucket) so as to avoid interruption of the main server. then go ahead and fulfil Task C and the rest


    TASK C: Set up your Infrastructure

    1. Set up your Environment: DEV, QA and PROD 

    Provision 3 Apache Tomcat Servers (You can only Use Terraform with preinstalled script)You can host this use any cloud provider - Aws, Google Cloud, Azure but AWS is preferred

    i. DEV - t2micro -8gb

    ii. QA(Quality Assurance) - T2Large-20gb

    iii. PROD - T2Xlarge-30gb

    Linux Distribution for Apache Tomcat Servers: Ubuntu 18

    2. Set up your Devops tools servers:

    (These can be provisioned  IAC Tool, and hosted on only ubuntu 22, I also expected this to be done with a preinstalled script)

    1 Jenkins(CI/CD) t2 xlarge 20gb

    1 SonarQube(codeAnalysis) t2medium 10gb

    1 Artifactory Server T2xl - 10gb


    TASK D: Set Up Automated Build for Developers 

    The Developers make use of Maven to Compile the code

    a. Set up a C/I  Pipeline in Jenkins using Jenkinsfile 

    b. Enable Webhooks in github to trigger Automated build to the Pipeline Job

    c. Help the developers to version their artifacts, so that each build has a unique artifact version


    Pipeline job Name: MultiShop_Build

    Pipeline should be able to checkout the code from SCM and build using Maven build tool, Provide code analysis ,codecoverage with sonarqube and upload artifacts to artifactory, Send slacks to the team and provide versioning of artifacts

    Pipeline should have slack channel notification to notify build status


    i. Acceptance Criteria:

     Automated build after code is pushed to the repository

    1. Sonar Analysis on the sonarqube server

    2. Artifact uploaded to artifactory

    3. Slack Channel Notification

    4. Each artifact has a unique version number

    5. Code coverage displayed


    TASK E: Deploy & Operate (Continous Deployment)

    a. Set up a C/D pipeline in Jenkins using Jenkinsfile

    create 1 CD pipeline jobs for each env (Dev, QA, Prod)

    Pipeline job Name:eg MultiShop_Dev_Deploy, MultiShop_QA_Deploy, MultiShop_Prod_Deploy


    i. Pipeline should be able to deploy any of your LLE (Dev,  Qa) or HLE (Prod ) 

    You can use DeploytoContainer plugin in jenkins and deploy to either  Dev, Qa or  Prod

    ii. Pipeline should have slack channel notification to notify deployment status

    iii. Deployment Gate

    1. Acceptance criteria:

    i. Deployment is seen and verified in either Dev, Qa or Prod

    ii. Notification is seen in slack channel


    TASK F: Monitoring

    a. Set up Continuous monitoring with Datadog by installing Datadog Agent on all your servers

     Acceptance criteria: 

     i All your infrastructure Sever metrics seen on Datadog Server

    ii Tag all your servers on the Datadog dashboard


    TASK G: Dockerize Application

    a. Automate the deployment of the Application into a docker image and write a deployment file and service file for it to be be deployed into K8s Cluster:


    Acceptance Criteria:

    i. Deploy new artifact from dockerhub to Kubernetes

    ii. App should be viewable in Grafana Dashboard


    Lead Architect - Remzy

    • Each Team/Person is to work independently with their supervisors to complete this project.
    • Every Task is expected to be completed within 1 week
    • We are adopting Agile style so each Team/Person is expected to have 15mins Daily Stand up meetings with your supervisors or in some cases the Lead Architect where you will discuss your progress(what you did yesterday, what you will do today, How far you are in achieving your goals and give general updates
    • This will be a 1 week Sprint After which you will have a Demo to Present all your accomplishments.
    • Please Note: DOE(Devops Engineers) and Architects from other establishments have been invited to your Demo so be prepared


    Monday, April 10, 2023

    Git Branching Strategy

     GIT BRANCHING STRATEGY


    Once you start your journey into software development, it won’t take long for you to run into Source Control Management (SCM) systems. By far the most popular of them all is Git. 


    Like most other SCMs, Git helps you manage your code in a way that allows for collaboration with team members. At the very core of Git, you will find that branching is one of its most helpful features.


    Branching is what allows multiple developers to work on the same project without interfering with what the others are doing. With branching, each developer works on their own branch, and once they are ready to move it into production, they get their branches merged. 


    In this guide, you’ll learn why Git branching is so valuable and get introduced to three different branching strategies.


    Why is Git branching important?

    Before we jump into the different branching strategies, you should know why they’re needed and why branching is so necessary in the first place. 


    Branching helps you collaborate with your team members without stepping on each other’s toes. Git branching makes it possible for a full software development team to work on the same codebase simultaneously. However, there are other reasons why you need a branching strategy.


    A branching strategy allows you to incorporate Git branching directly into your workflow. The most common use case is to enable Continuous Integration and/or Continuous Delivery. By using different branches, you can run automated tests every time something is pushed to a specific branch, making sure the code works before it gets merged into the production branch.


    Automated tests aren’t the only type of tests you can do when you start implementing branching. You can also use different branches to perform A/B testing, deploy the code from two different branches, and redirect customers to one application or the other. This allows much finer control of what is running in the “main” branch that is considered production.


    Types of Git branching

    There are multiple types of Git branching strategies you can use for your projects. The three branching strategies listed below are a fraction of all the different strategies that exist; however, they are the three most popular strategies at the time of writing.


    Git Flow


    Git Flow is by far the most popular Git branching strategy out there, and it’s one of the oldest still in use today. It centers around having two branches: "main" and "develop." The principle behind this strategy is that all the code being developed is merged to the develop branch. Once you’re ready to make a release, you open up a pull request (PR) into the main branch. Essentially, this means that every commit in the main branch is a release in itself.


    This doesn’t mean that every developer should be pushing into the develop branch every time they have something they need to add to the codebase. Instead they rely on what’s known as feature branches. As the name suggests, a branch is created for each new feature. The team can work on this feature branch until it’s ready to be merged into develop. Typically, at this point the feature is done.


    With the feature branch done and ready to be merged into develop, it’s up to the team to decide how exactly they want to accomplish this. Many teams opt for a CI/CD approach and get the branch automatically tested, as well as reviewed by either team members or someone else with insight into the codebase. Once the feature branch has been merged into develop, it is deleted. At this point, you can either wait for more features to be merged into develop, or you can get develop merged into main for a release. In the end, Git Flow is highly defined and leaves teams with very little to decide for themselves, which can be a good thing as it leaves less work on the implementation.


    GitHub Flow


    Whereas Git Flow is a defined process, GitHub Flow is a bit looser on the concepts, allowing each team to define the way it works best for them. In reality, GitHub Flow doesn’t so much define the parameters on how each new branch should be created, but rather focuses on how the different branches should interact. One big difference from Git Flow is that it doesn’t have any develop branch. All new branches are built out from main and merged directly back into main.


    So if GitHub Flow doesn’t dictate what branches need to be developed, what does it dictate? First of all, it defines that branches do need to be created, and that they should be created from main. From here, you can treat your branches however you please. In terms of the flow, there’s no difference between a branch that’s meant for a hotfix or for a full feature.


    The other thing that GitHub Flow defines is the need to create a PR to get things merged into main. The PR needs to be viewed as a collaboration tool, where team members can comment on features and code. All in all, GitHub Flow does mean that teams have to work a bit more on the implementation to figure out what makes the most sense, but this also means that it comes with a lot of flexibility.

    Thursday, March 30, 2023

    How to Install ChatGPT in VSCode

     ChatGPT – or Chat Generative Pre-Training Transformer – has been making waves in the tech industry recently.

    It was first launched in November 2022. Then the upgraded ChatGPT-4 came out in March 2023.

    In this tutorial, I will explain how you can use ChatGPT to become more productive. Then I'll walk you through how you can install the ChatGPT extension within your VSCode editor.

    How Can ChatGPT Help You Out?

    In today's fast-paced world, productivity is critical, and ChatGPT can help you achieve more in less time. While many devs use it for debugging, generating dummy code, or rewriting text, there are other important uses of ChatGPT:

    1. Chatting with ChatGPT is as if you are chatting with a human, making it an intuitive and user-friendly tool.
    2. ChatGPT maximizes productivity by getting quick and accurate answers to your questions.
    3. ChatGPT can learn from user interactions and improve over time. This makes it a valuable resource for individuals and businesses alike, helping them stay competitive in an increasingly fast-paced and demanding world.
    4. ChatGPT can act as an assistant which can save you time by completing tasks faster and more efficiently.

    How to Install ChatGPT in VsCode

    By installing CodeGPT, you can enhance your productivity without needing to exit your Integrated Development Environment (IDE). With the extension installed, you gain convenient access to ChatGPT's features. Here's how you can do that.

    To access the list of extensions in VSCode, go to the "View" menu, and click on "Extensions" from the drop-down list.

    extension
    opening the extension in Vscode 

    After opening the extensions panel, you'll be taken to a marketplace where you can browse and install various tools that can enhance your workflow in the IDE.

    To install ChatGPT, simply type the word "CodeGPT " in the search bar and hit enter. This should bring up the extension, and from there you can click on the "Install" button to add it to your VsCode environment.

    codegptexplain
    Vscode marketplace showing the list of plugins that can be installed

    To begin using the extension, open the browser, search for or visit OpenAI, and generate an API key.

    chrome-capture-2023-2-25--1--6
    The website openai.com

    You can access the API reference by following these steps:

    • Locate the menu bar at the top of the webpage
    • Click on the developer's section in the menu
    • A drop-down menu will appear
    • Select the API reference option from the drop-down menu
    OPENAI-API-5
    To get the API reference

    Once you have accessed their website, you'll need to either create a new account or sign in with Google.

    If you choose to create an account, you'll need to provide your email address and set up a password. Alternatively, you can select the "Login with Google" option to use your existing Google account credentials. After successfully logging in, you'll have access to the site's features and content.

    creating an account with openai.com

    Once you have gained access to your account, click on it to reveal a drop-down menu. Then select "View API Keys" from the options provided.

    View API Keys

    This will take you to the next page. API Keys: Click the "Create new secret key" button to generate an API key that will be integrated into your VSCode.

    api-key-openai
    Generating the API Keys

    To integrate your generated API keys, follow these steps:

    • Go back to VSCode.
    • Open the settings.
    • In the search bar at the top of the settings window, type "CodeGPT".
    • Copy and Paste the generated API key in the "CodeGPT: API Key" section.
    how the generated API Key is integrated into VSCode

    After integrating your API key into VSCode, it will be listed as an installed extension.

    code-gpt-extension
    The codeGPT icon showing it has been installed

    After a successful installation, you can use CodeGPT in your VSCode.

    And here's an example showing the result once CodeGPT is installed in your VSCode:

    Example of ChatGPT in VSCode

    Conclusion

    By following the step-by-step guide for installing ChatGPT in VSCode, you can increase your productivity and accomplish more tasks efficiently with the help of this language model.

    Jenkins Scripted Pipeline - Create Jenkins Pipeline for Automating Builds, Code quality checks, Deployments to Tomcat - How to build, deploy WARs using Jenkins Pipeline - Build pipelines integrate with github, Sonarqube, Slack, JaCoCo, Nexus, Tomcat

      Jenkins Scripted Pipeline - Create Jenkins Pipeline for Automating Builds, Code quality checks, Deployments to Tomcat - How to build, depl...