How to Deploy to Kubernetes using Argo CD and GitOps
Using Kubernetes to deploy your application can provide significant infrastructural advantages, such as flexible scaling, management of distributed components, and control over different versions of your application. However, with that increased control comes increased complexity. Continuous Integration and Continuous Deployment (CI/CD) systems usually work at a high level of abstraction in order to provide version control, change logging, and rollback functionality. A popular approach to this abstraction layer is called GitOps.
GitOps, as originally proposed by Weaveworks in a 2017 blog post, uses Git as a “single source of truth” for CI/CD processes, integrating code changes in a single, shared repository per project and using pull requests to manage infrastructure and deployment.
There are several tools that use Git as a focal point for DevOps processes on Kubernetes. In this tutorial, you will learn to use Argo CD, a declarative Continuous Delivery tool. Argo CD provides Continuous Delivery tooling that automatically synchronizes and deploys your application whenever a change is made in your GitHub repository. By managing the deployment and lifecycle of an application, it provides solutions for version control, configurations, and application definitions in Kubernetes environments, organizing complex data with an easy-to-understand user interface. It can handle several types of Kubernetes manifests, including Jsonnet, Kustomize applications, Helm charts, and YAML/json files, and supports webhook notifications from GitHub, GitLab, and Bitbucket.
Step 1 — Installing Argo CD on Your Cluster
In order to install Argo CD, you should first have a valid Kubernetes configuration set up with kubectl, from which you can ping your worker nodes. You can test this by running kubectl get nodes:
This command should return a list of nodes with the Ready status:
OutputNAME                   STATUS   ROLES    AGE   VERSION
pool-uqv8a47h0-ul5a7   Ready    <none>   22m   v1.21.5
pool-uqv8a47h0-ul5am   Ready    <none>   21m   v1.21.5
pool-uqv8a47h0-ul5aq   Ready    <none>   21m   v1.21.5
If kubectl does not return a set of nodes with the Ready status, you should review your cluster configuration and the Kubernetes documentation.
Next, create the argocd namespace in your cluster, which will contain Argo CD and its associated services:
After that, you can run the Argo CD install script provided by the project maintainers.
Once the installation completes successfully, you can use the watch command to check the status of your Kubernetes pods:
By default, there should be five pods that eventually receive the Running status as part of a stock Argo CD installation.
OutputNAME                                  READY   STATUS    RESTARTS   AGE
argocd-application-controller-0       1/1     Running   0          2m28s
argocd-dex-server-66f865ffb4-chwwg    1/1     Running   0          2m30s
argocd-redis-5b6967fdfc-q4klp         1/1     Running   0          2m30s
argocd-repo-server-656c76778f-vsn7l   1/1     Running   0          2m29s
argocd-server-cd68f46f8-zg7hq         1/1     Running   0          2m28s
You can press Ctrl+C to exit the watch interface. You now have Argo CD running in your Kubernetes cluster! However, because of the way Kubernetes creates abstractions around your network interfaces, you won’t be able to access it directly without forwarding ports from inside your cluster. You’ll learn how to handle that in the next step.
Step 2 — Forwarding Ports to Access Argo CD
Because Kubernetes deploys services to arbitrary network addresses inside your cluster, you’ll need to forward the relevant ports in order to access them from your local machine. Argo CD sets up a service named argocd-server on port 443 internally. Because port 443 is the default HTTPS port, and you may be running some other HTTP/HTTPS services, it’s common practice to forward those to arbitrarily chosen other ports, like 8080, like so:
Port forwarding will block the terminal it’s running in as long as it’s active, so you’ll probably want to run this in a new terminal window while you continue to work. You can press Ctrl+C to gracefully quit a blocking process such as this one when you want to stop forwarding the port.

In the meantime, you should be able to access Argo CD in a web browser by navigating to localhost:8080. However, you’ll be prompted for a login password which you’ll need to use the command line to retrieve in the next step. You’ll probably need to click through a security warning because Argo CD has not yet been configured with a valid SSL certificate.
Before using it, you’ll want to use kubectl again to retrieve the admin password which was automatically generated during your installation, so that you can use it to log in. You’ll pass it a path to a particular JSON file that’s stored using Kubernetes secrets, and extract the relevant value:
OutputfbP20pvw-o-D5uxH
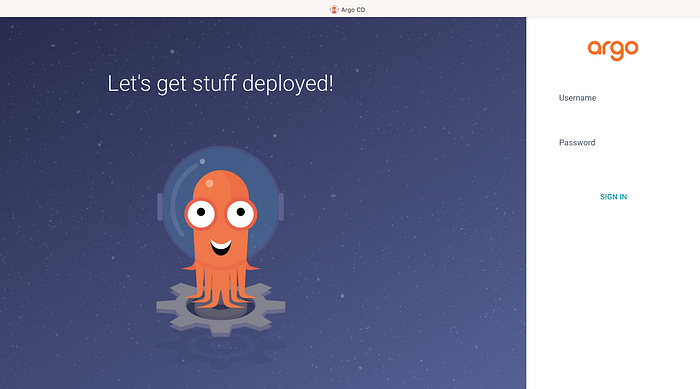
You can then log into your Argo CD dashboard by going back to localhost:8080 in a browser and logging in as the admin user with your own password:

Once everything is working, you can use the same credentials to log in to Argo CD via the command line, by running argocd login. This will be necessary for deploying from the command line later on:
You’ll receive the equivalent certificate warning again on the command line here, and should enter y to proceed when prompted. If desired, you can then change your password to something more secure or more memorable by running argocd account update-password. After that, you’ll have a fully working Argo CD configuration. In the final steps of this tutorial, you’ll learn how to use it to actually deploy some example applications.
Deploying Your First Application with ArgoCD
Step 1: Create a Git Repository
First, create a Git repository that contains your Kubernetes manifests. This repository will serve as the source for ArgoCD to deploy your application.
Step 2: Create an Application in ArgoCD
Method 1: Using the ArgoCD UI
- Create a Git Repository: First, create a Git repository that contains your Kubernetes manifests. This repository will serve as the source for ArgoCD to deploy your application.
- Create an Application in ArgoCD:
- In the ArgoCD dashboard, click on
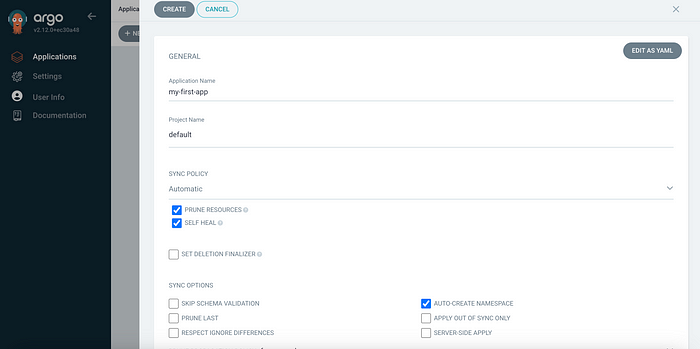
New Appand fill in the following details: - Application Name:
my-first-app - Project:
default - Sync Policy: Manual or Automatic (your choice)
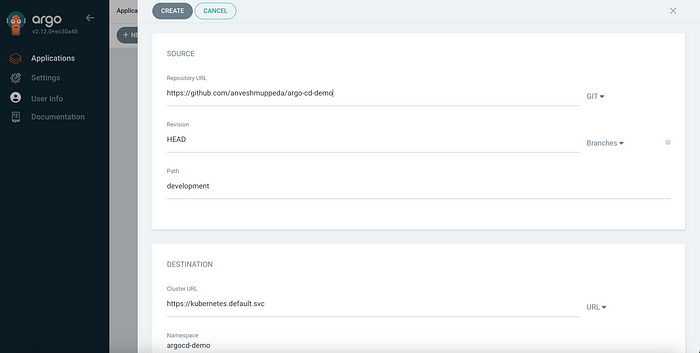
- Repository URL: URL of your Git repository
- Path: Path to your Kubernetes manifests in the repository
- Cluster URL: Leave as default for your current cluster
- Namespace: The namespace where the application should be deployed


Once the application is created, click on Sync to deploy the application to your Kubernetes cluster. If Sync Policy Set to Automatic then application will be deployed to kubernetes automatically.
Syncing and Monitoring Your Application
After syncing, ArgoCD will start deploying the application. You can monitor the progress in the dashboard. If there are any issues, ArgoCD will highlight them, and you can take corrective actions directly from the UI.
ArgoCD also supports features like automated rollbacks, self-healing, and more, ensuring your Kubernetes cluster is always in the desired state as defined in your Git repository.
Step 6.1: Automatic Sync on GitHub Updates
One of the powerful features of ArgoCD is its ability to automatically sync your Kubernetes cluster with your Git repository. This means that any changes you make to your manifests in GitHub will be automatically applied to your cluster.

